How to make beautiful drawings for Easter 2021 in pencil
Children begin to be introduced to traditions and holidays in kindergarten. Most often, the introduction takes place in the work and creative process. But what to come up with parents if you need to create a picture for the upcoming holiday? We have selected for you the most interesting briefings that will tell you how to make beautiful drawings for Easter 2020 with pencil and paints.
Simple and cute drawings for Easter
Spring is a great time for creativity. And if you have already done spring crafts, it’s time to prepare for Easter.
In the first instruction we invite you to consider bright, simple and cute examples. You can use them not only as a usual kind of creativity, but also to issue them a card or a gift. To work we use paper, markers, pens, you can take a regular pencil if you want to train.
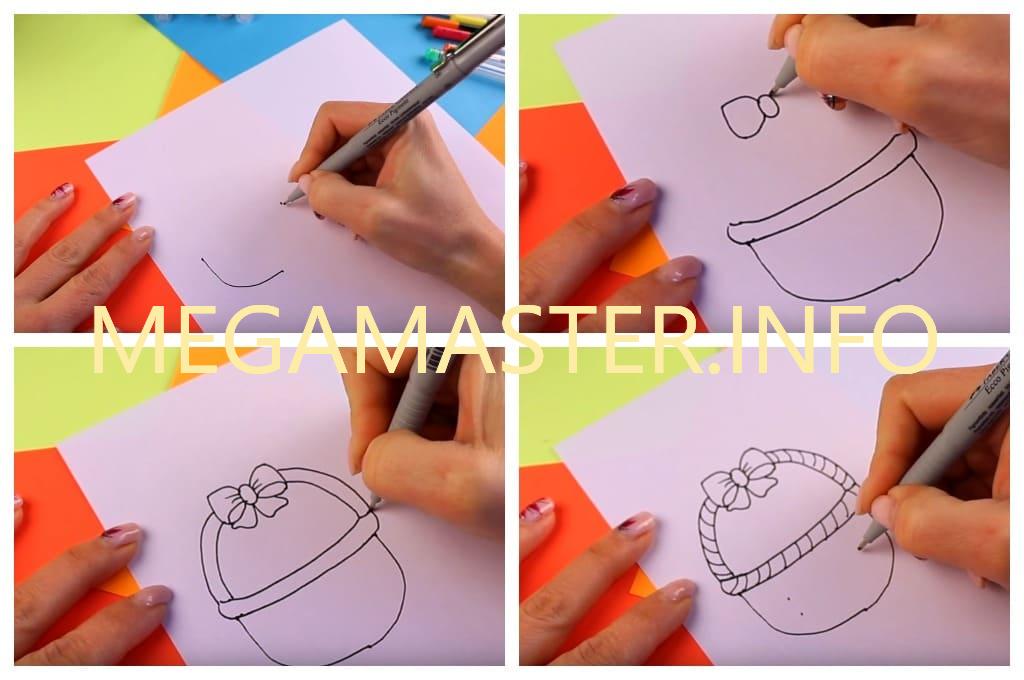
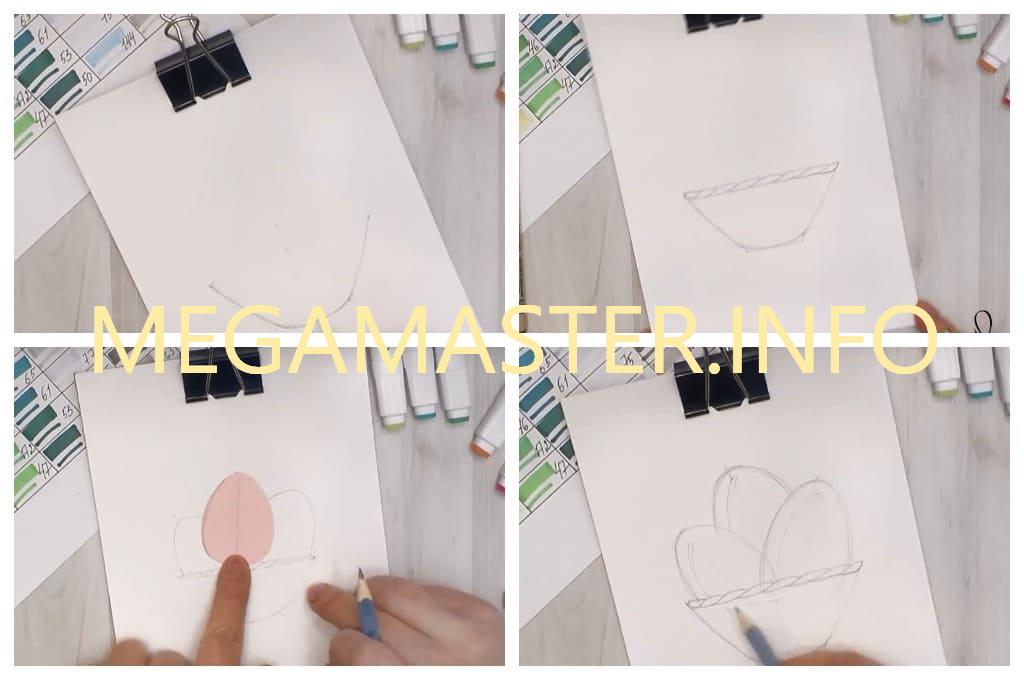
First, draw a basket of eggs:
- We put t
 hree points. Smooth lines connect the dots to mark the boundaries of the basket. Make the bottom flatter.
 - Add two brackets on top. We connect them with two lines at the top and bottom. We get the side of the basket. Above the outline of the basket draw a bow. From it we carry under two arcs in each direction, it is the handle of the basket. Add small brackets inside the handle and on the side of the basket to make it look like a woven basket.
- Let’s draw a face on the basket. We use two circles for the eyes. Inside add two more circles. The second circle inside paint. Add eyelashes and small eyebrows to your eyes.
- Under the eyes we will depict a smile with the help of an arc. Downstairs, add another slightly tilted one to one side. Inside, we will place the tongue and paint the center black. Let’s draw rounded cheeks and all over the picture of the basket will draw rounded lines on the look. Now the basket really looks like a woven one.
- Coloring. Let’s make the bow and tongue red. The basket itself can be decorated in yellow. The basket is ready, but so far it is unlike Easter. Add eggs inside it. Paint them in an arbitrary order, decorate and paint.
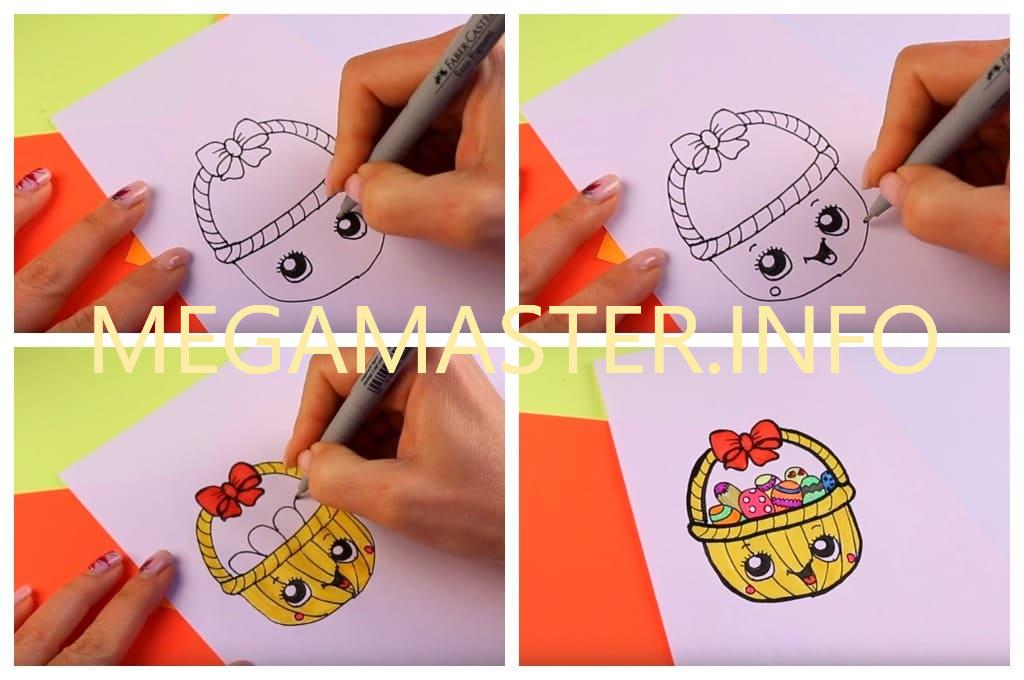
One drawing on the theme of Easter is ready.
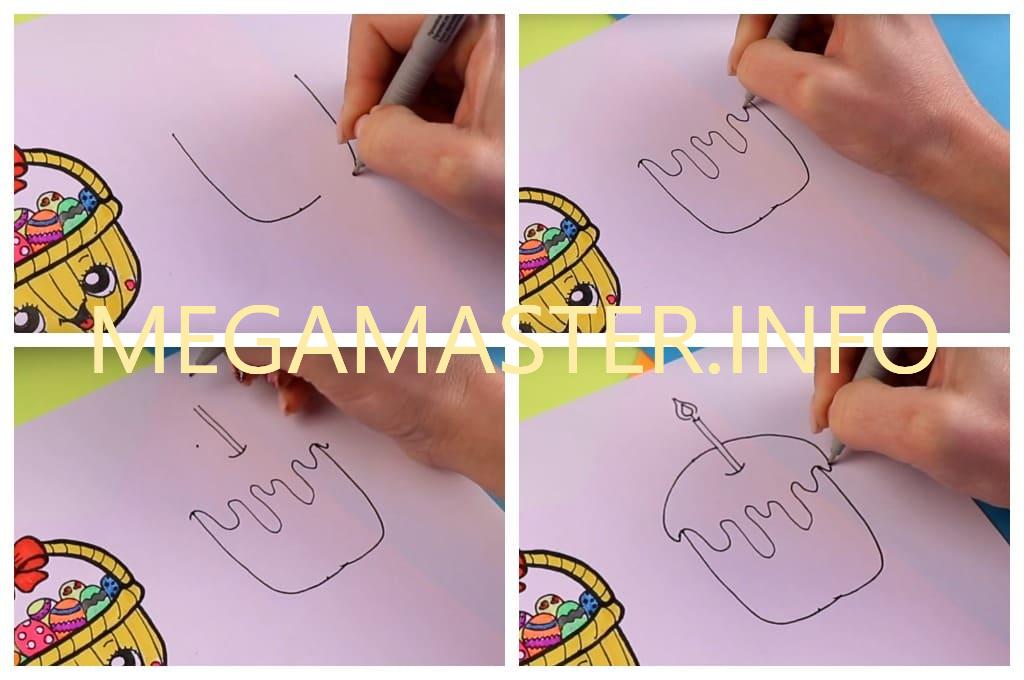
Now let’s draw a cake:
- As with drawing a basket, dots mark boundaries and make a smooth connection with lines. We make the bottom even. The wavy lines at the top will show a flowing glaze.
- Point mark the edge of the top. Draw an arc, add to it two sticks – it will be a candle. Let’s draw a little light on it. We connect the top of the cake.
- Light brown pencil will paint the bottom of the cake. Okay, we’re going to have a ruddy crust. Paint a candle and light on it. In circles, let’s create a kind of sprinkle on the glaze. Wide arcs draw cunning eyes on the cake, add mouth, eyebrows and eyelashes.
- Let’s put it all in a marker. Paint with bright colors sprinkle.
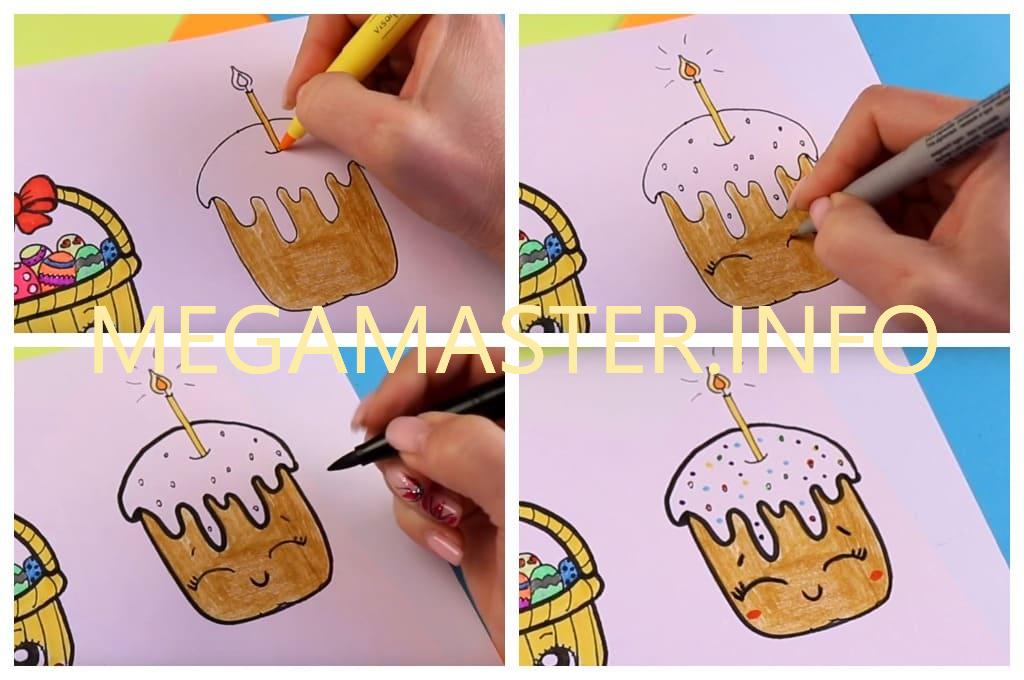
You’ve done the job.
Let’s draw an Easter bunny:
- First, let’s sketch with a simple pencil. Draw an oval head. Inside add round eyes and a triangular spout with a smile.
- The torso of the back of the paddy is also drawn with the help of an oval. It should be smaller than the head. We depict the paws and add a strip of shorts on the torso.
- We’re painting the ears. One will be directed upwards. The second will be tilted downwards. Ready sketch outline a black pen.
Immediately paint the eyes, leave inside the glare and add the lashes. Let’s draw a carrot in the legs of the fly and highlight the devil’s fingers. - Paint the zaika in blue. We’re going to make the center of the ears pink. We’ll make the shorts of the zaika green.

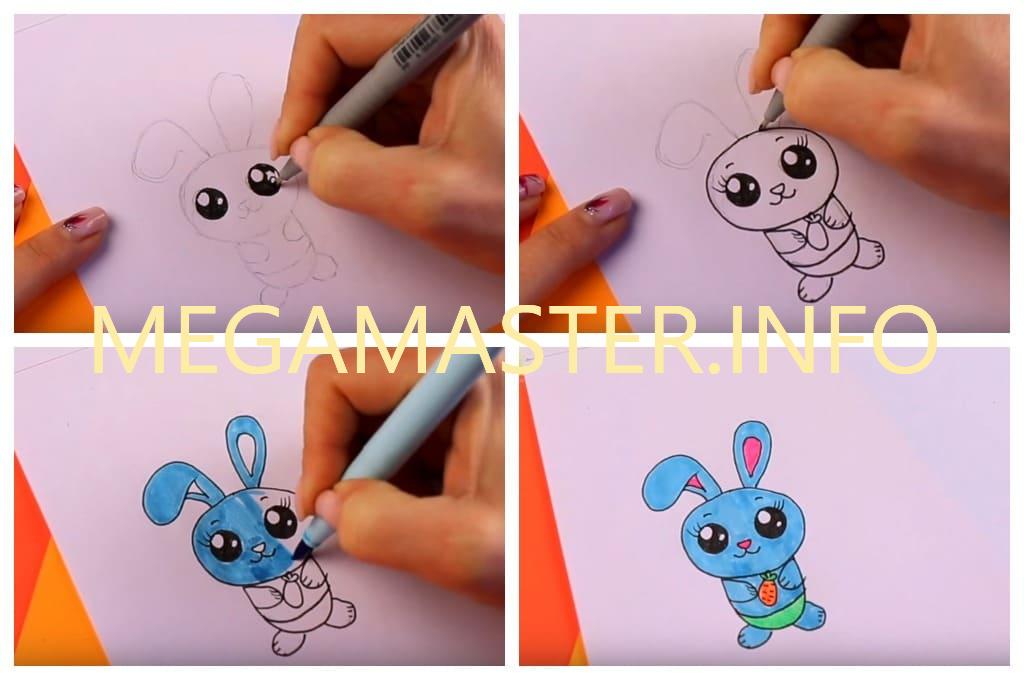
The zayka was drawn. There’s one last example.
Add to the pictures already made of chicken:
- Again we use a simple pencil. Draw a figure similar to an egg. At the bottom add the legs, and on the sides of the wings. At the top of the picture we depict round eyes and a triangular beak.
- We outline the outline with a black pen. Add another circle in the eyes, and with the edge of a thin strip. Paint your eyes. Draw eyebrows and chub. We draw the 9ps on the legs and the body of the chicken.
- Paint. Let’s make the chicken yellow, and the beak and legs orange. You can add small, round cheeks.
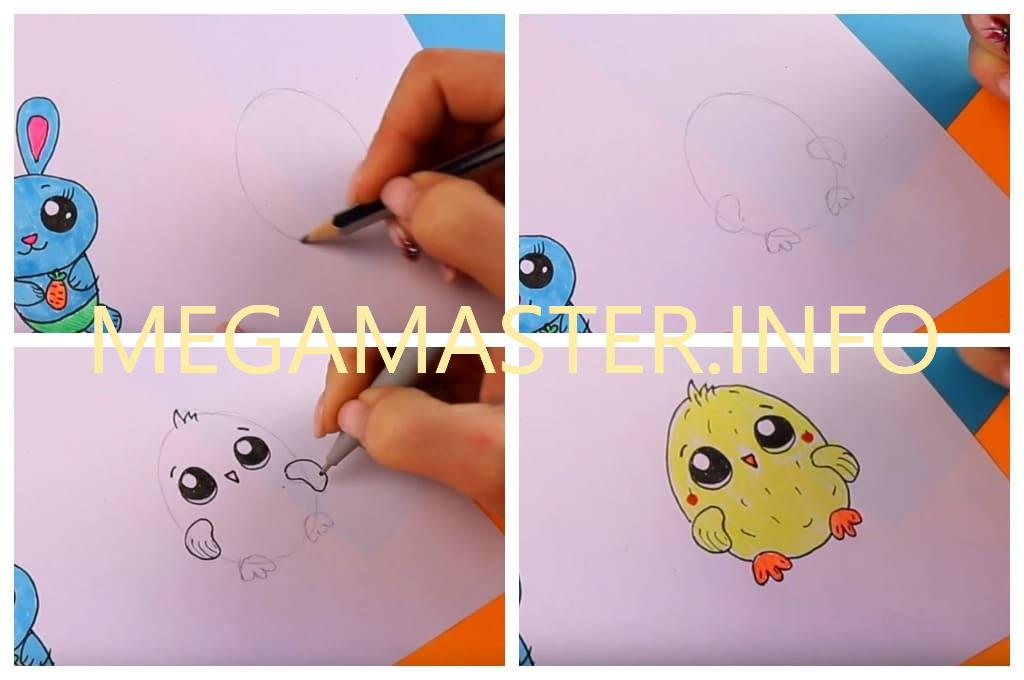
The chicken is ready. These are the cute Easter drawings you can make in just a few minutes.
Figure for Easter markers
Now let’s try to draw a beautiful picture for the holiday. Let’s draw an Easter basket with eggs with a pencil and markers:
- Let’s sketch with a simple pencil. Draw two lines, tilted to the center. We connect them downstairs. At the top add the bezel. Make it in brackets to get weaving.
- Now we need to put eggs inside the basket. You can draw them arbitrarily by hand. You can make a template. Fold the sticker in half, picture half the egg, cut the blank and circle it in the right places of the basket. Mark the glare places on the eggs.
- Decorate the space between the eggs and near the basket with small flowers. Arrange them in a chaotic manner. Sketch with a black pen and begin to paint.
- For the first testicle we use three colors: dark yellow, orange and red. We make thin yellow stripes. Add broad orange and leave the shadows red. On the yellow stripes, there are red dots.
- The second egg will be painted with lettuce, green and blue. Paint the entire surface with lettuce, add a green pattern in the form of dots and mesh. We make the shadows blue.
- The next egg will be painted pink, crimson and dark pink. We depict wavy lines with crimson. Ordinary pink paint the light side, and dark highlight shadows.
- For flowers, we will use blue, turquoise and dark blue. The edges of the flowers paint blue, and the contours make dark blue and turquoise. Leaves make salad. All that’s left is the basket. For it, use colors closer to cream.
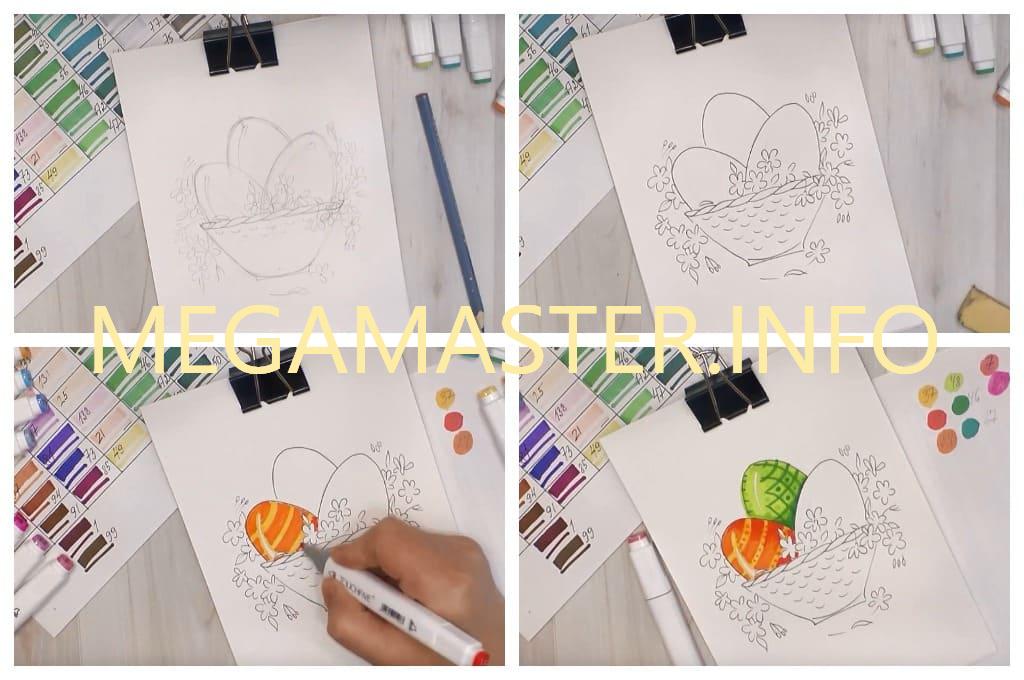
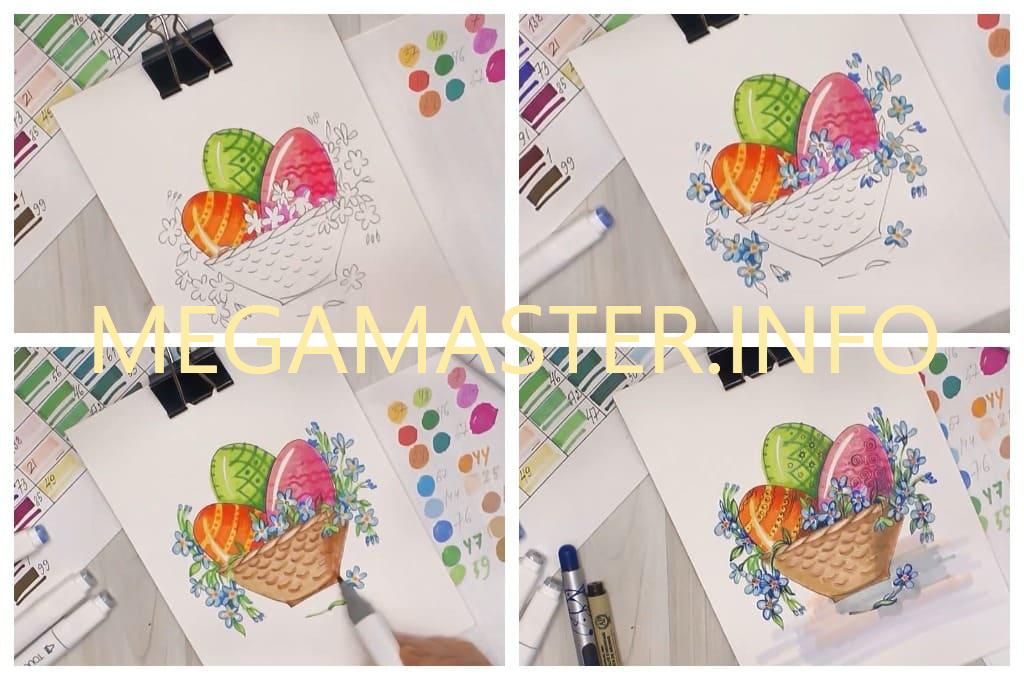
The job is done. Such drawings at Easter to school will always look successful. But this is not the last option for creativity.
Easter Bunny
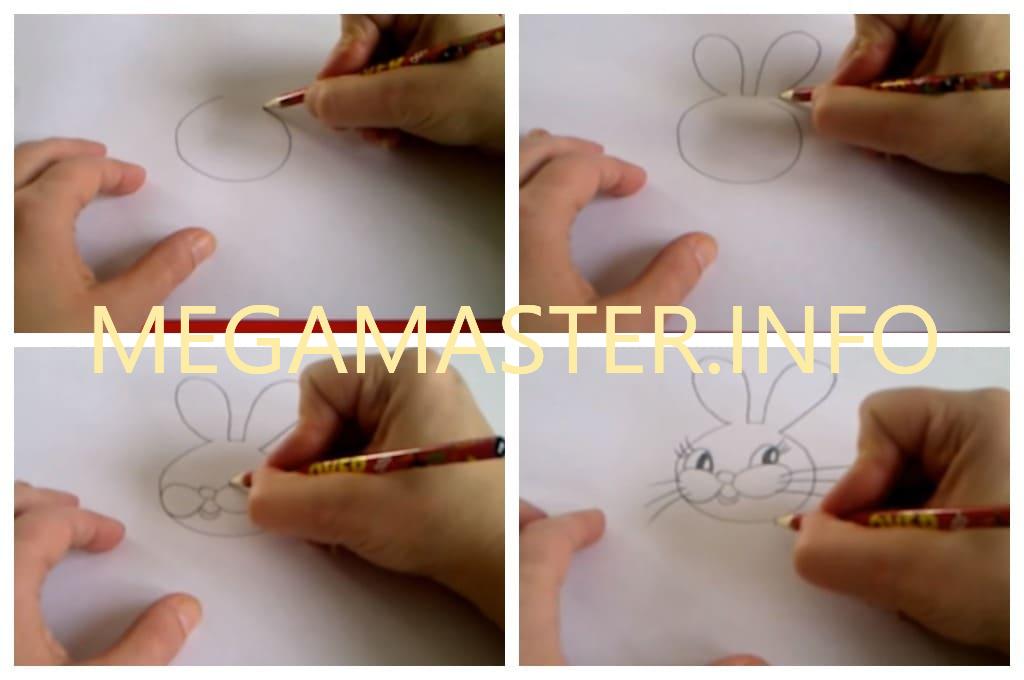
The next drawing is suitable for small artists. Let’s try to create an Easter drawing with a bunny. To work we offer to use an eraser and a simple pencil. We at the megamaster.info did not paint the picture, you will be able to design it on your own.
Begin:
- Let’s draw a circle. We don’t connect the top of the circle. Here we will remove two long ears. Let’s make a muzzle. Draw a rounded spout and add on the sides of it cheeks. With the help of braces, we will make a mouth. Above the cheek we will remove the semi-oval eyes with the pupils. Add eyelashes and mustache.
- At the bottom under the head with the help of a curved line we will remove the back of the bunny. At the bottom of the elongated oval will mark the lower foot. Add a fluffy ponytail and an upper foot.
- Next to the bunny, we’ll make an egg. He’s going to keep it in his feet. We’re going to make the testicle great. It will start from the lower paws and end near the head. Decorate the testicle with a pattern, we used small flowers.

The picture for Easter is ready, you have only to paint it.
Easter basket with eggs
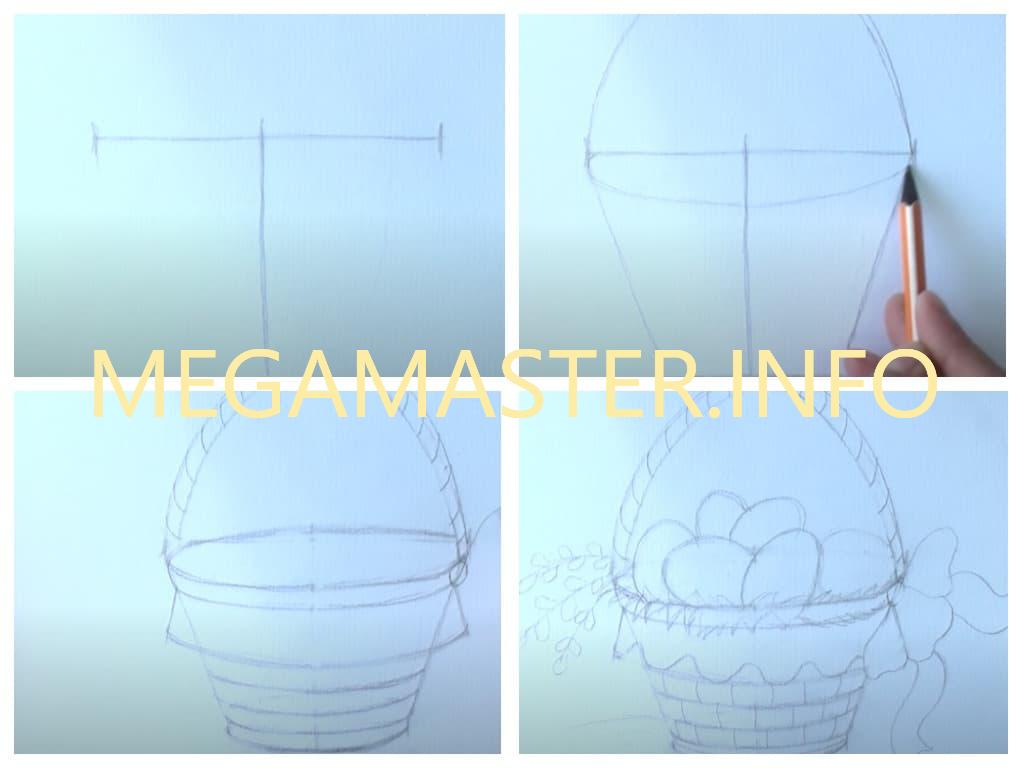
For those who like to draw only with pencils, we have chosen this lesson. Let’s try to depict the basket:
- Let’s create a sketch of a basket.
- Remove unnecessary contours. We sketch the eggs and add the contours of the bow. We note in the picture of the place. Where the leaves and flowers will be. We picture the handle for the basket. Give her a woven look. After that, you can create several flowers.
- Gently shad the eggs. Decorate with a pattern. After that, you can add a few more colors and detail the bow. The contours of leaves and flowers make more clear.
- In the final stage, we will start hatching flowers. Add shadows on some areas of the basket where there is weaving. Make a bow, shade on eggs, basket and flower roots.
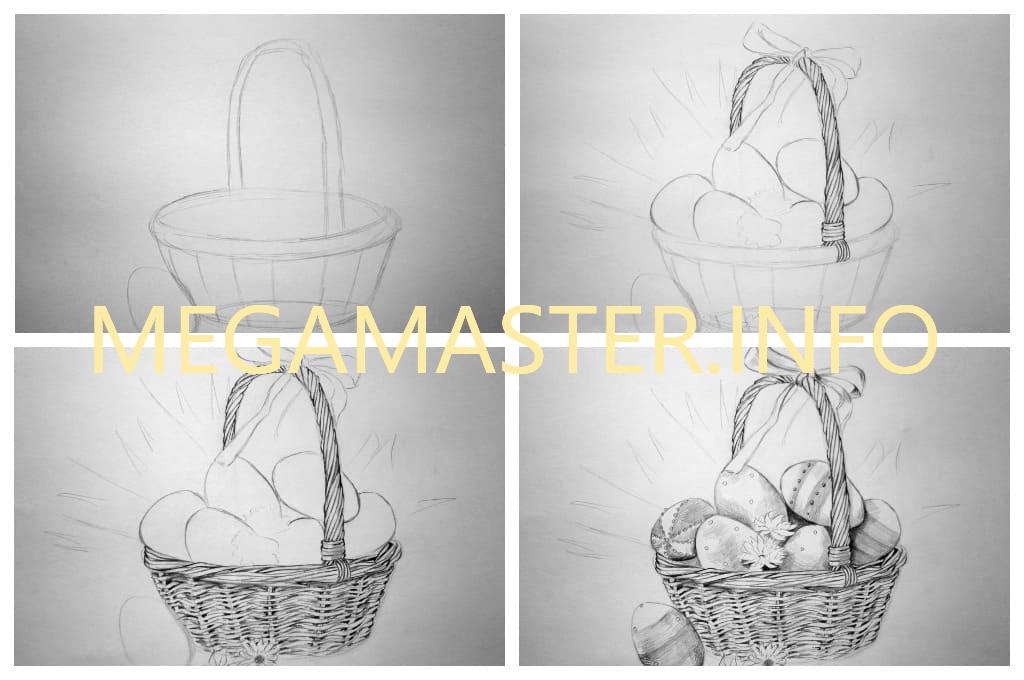
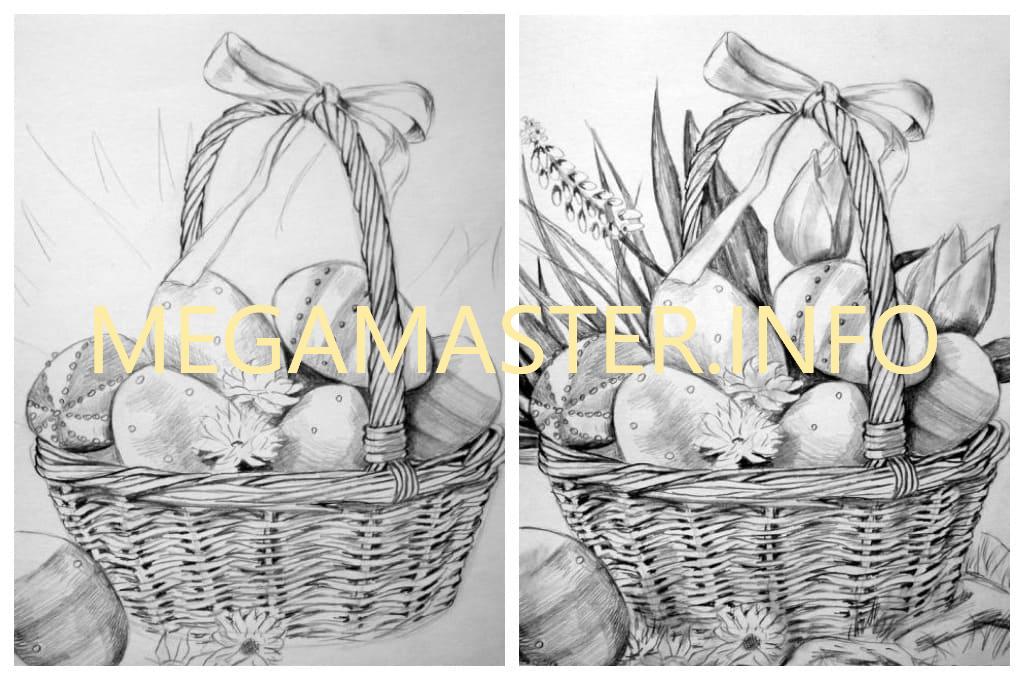
We drew a picture on the theme of Easter.
Still Life with Willow
If you need a beautiful, you can even say professional, but at the same time a simple picture, stop at this option.
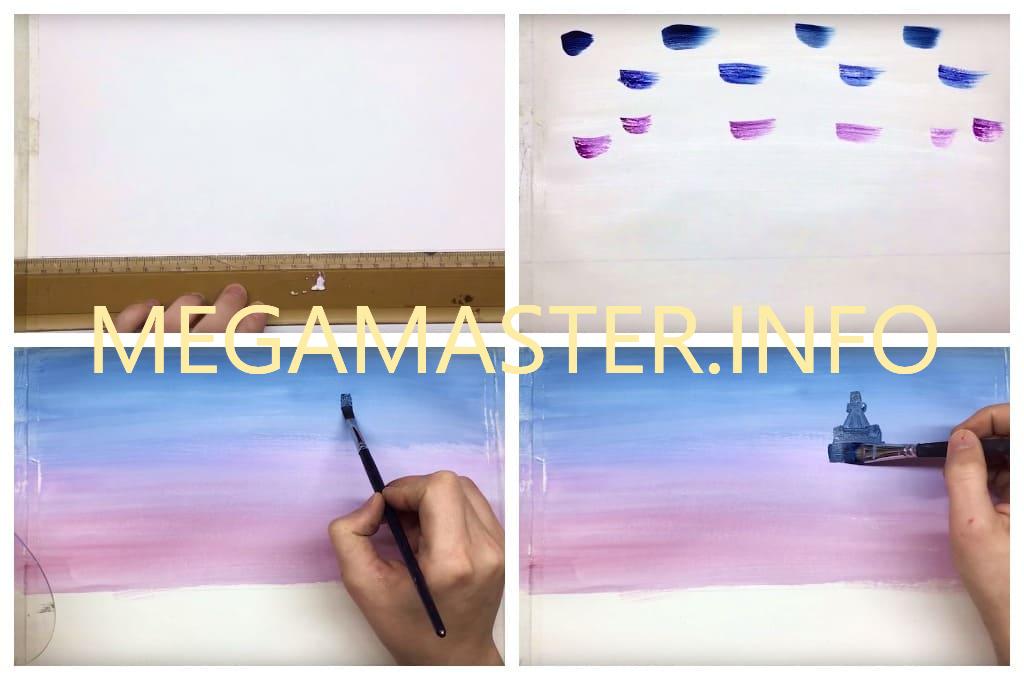
To make the following drawing for Easter for the school event, we will use:
- Tape paint;
- watercolor paper;
- With a simple pencil
- The ruler;
- (foam);
- gouache;
- brushes of different sizes;
- Water;
- dryer for drying.
Let’s start drawing:
- We attach the sheet to the work surface. We retreat from the bottom edge five centimeters and draw a line with a pencil. The gag removes the extra pigment of the pencil.
- We prime the surface of the leaf with white gouache. At the top of the sheet we put dots from different colors. We’re going to need azure iron, ultramarine and purple light and red paint. We blend the dots to the formation of a common background. These colors will help create an early morning look.
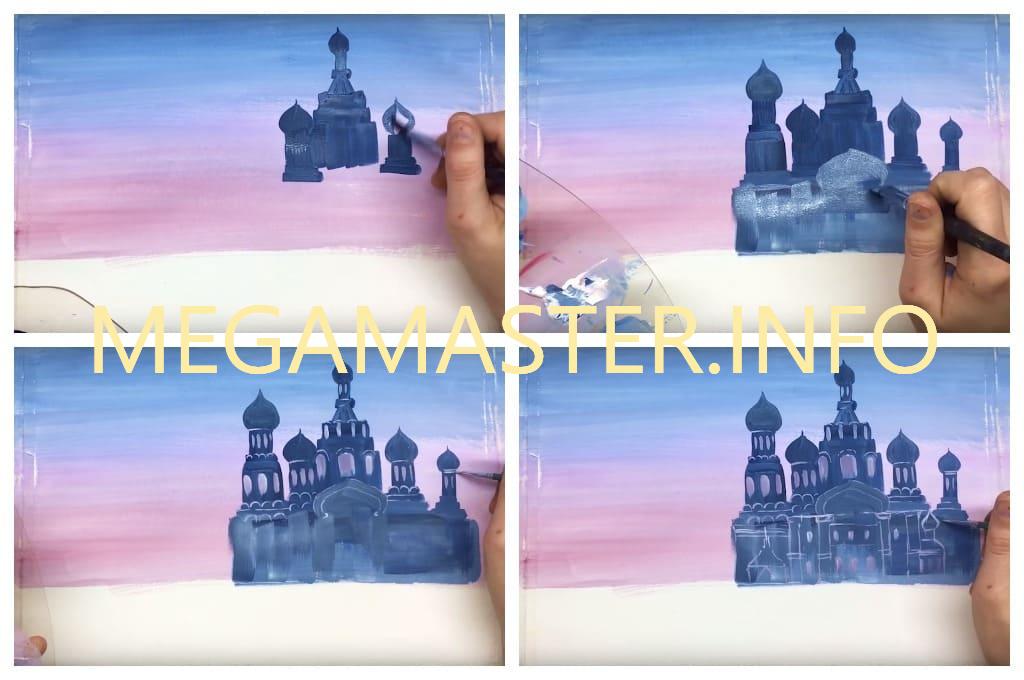
- The azure of the iron begin to draw the cathedral. We draw with horizontal and vertical stripes. At the same time, it is necessary to alternate brushes wide and narrow flat. We plan the location of the central tower and two side towers. Change the brush to a round drawing of the tops of the towers. Similarly, we add more towers.
- Add white gouache to the paint and fill the base of the cathedral with vertical strokes. Paint the whole gap to the pencil line.
- Mix ultramarine with white and neat strokes depict the windows on the structure. Lines highlight the features of the cathedral. Thin brush draw small details. Don’t try to do exact detailing, as this work will be very difficult.
- The thinnest brush draw the trees and their branches. Don’t get too close to them. Add more white paint and point strokes depicting foliage. Try not to make the smears too dense.
- Let’s move on to the front plan. Mix the umbra, the white and the red. Cover the entire bottom section of the sheet. Now we need to make the umbra darker. On the left side we will draw a cake. Add light and shadow to it.
The fudge on the cake can be drawn with the help of mixed ohra and whitewash. On the right side add more white. You can decorate the cake with a candle and a multi-colored sprinkle. - Put the pastry on a delicate napkin. To do this, use a white gouache and a thin brush. You can draw your own pattern or focus on ours.
- The finishing touch in the picture can be a bouquet of willows. Draw umbra branches that will lie near the cake. We draw bulges on the branches. To make the branches 3D apply white and barely noticeable blue paint to the fluffy areas. Point indicate fluffiness.
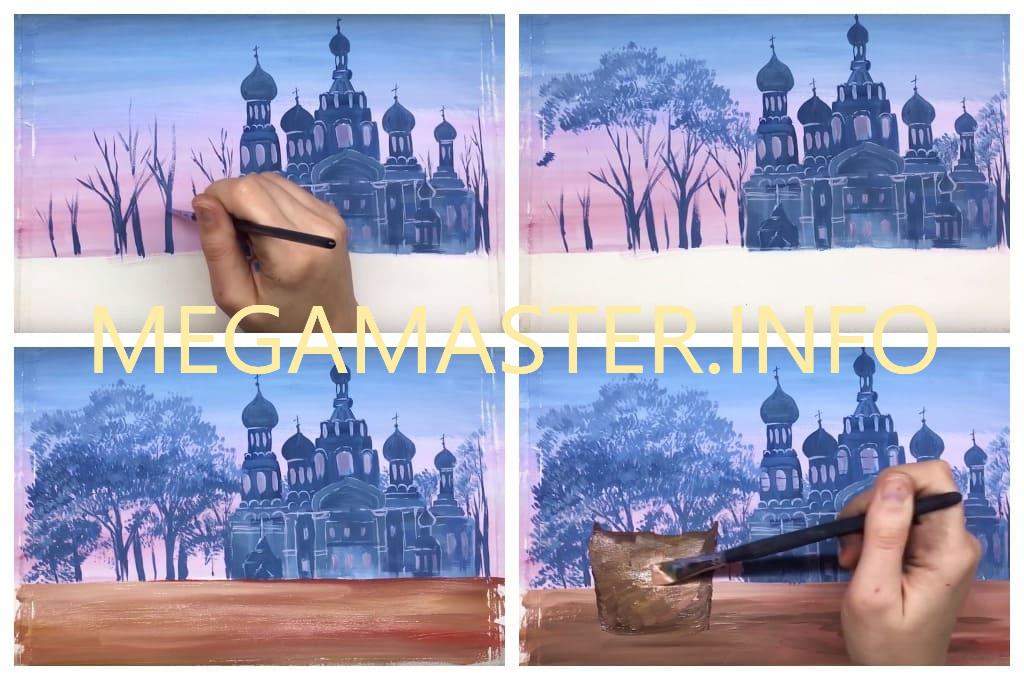


Ready.
We suggest you do not dwell on the drawings and make crafts for Easter
Easter basket watercolor pencils.
March 8 has passed, carnival is also the next holiday, which is prepared by all Christian people – Easter. In the old days, and somewhere and still in this holiday children go home, collecting different sweets and eat Easter cakes. Also on this day traditionally paint eggs with onions or dyes. And until we run away to the table to eat all these goodies, draw them!
Need:
- eraser
- Simple pencil
- Watercolor pencils
- Water
- Brush
- To begin with, the segment mark the length of the basket and height, from below draw a cut – the bottom of the basket. Connect the lines to make a trapeze, at the top draw the arc-handle of the basket. Draw two circles to make it seem that the basket is voluminous and the bottom dulls sharp corners.

- Let’s start sketching the decor of the basket, draw an elongated rectangle on the sides of the handle, and divide the entire basket on the line. The handle is supplemented with another line and shaded, followed on the side of the basket by smooth, oval lines outline a bow.
- Inside the basket with the help of ovals we plan a few eggs, stroke the basket to the end, and draw a little decor in the form of grass inside and sprigs of Verba. We wash the extra lines and plan the lawn in the background.
- We shade the parts of the handle and bow in dark purple, play with shades the farther from the beginning, the smaller and paler the color. Paint the decor on the basket for additional decoration you can put patterns in the form of dots or something else. Bright pink color slightly cover the purple, brown paint the rest of the basket.
- Contour outline a clear and bright color, paint more pale, in the same way paint the entire basket. The bottom of the basket is brightly contoured by dark brown, in the same way we make a shade under the decor of the basket.
- Bright yellow cover the brown on the pattern of the basket, in the coloring of eggs show imagination, you can use any shades and patterns. The egg picture uses bright yellow, blue, orange, purple, pink, and light green.
- The grass around the eggs is painted dark green and in the middle add light green. Gray we hug the branches of the willow and the flowers themselves, do not forget about the shade and strokes from below draw a light green lawn. Also shade the sky with a soft blue hue, and finally left to blur the brush and a small amount of water sky, lawn, basket decor and shade under it.
- If necessary, wash the brush, so that the colors are not messed up and similarly melt all the parts of the picture to make the picture look even brighter.

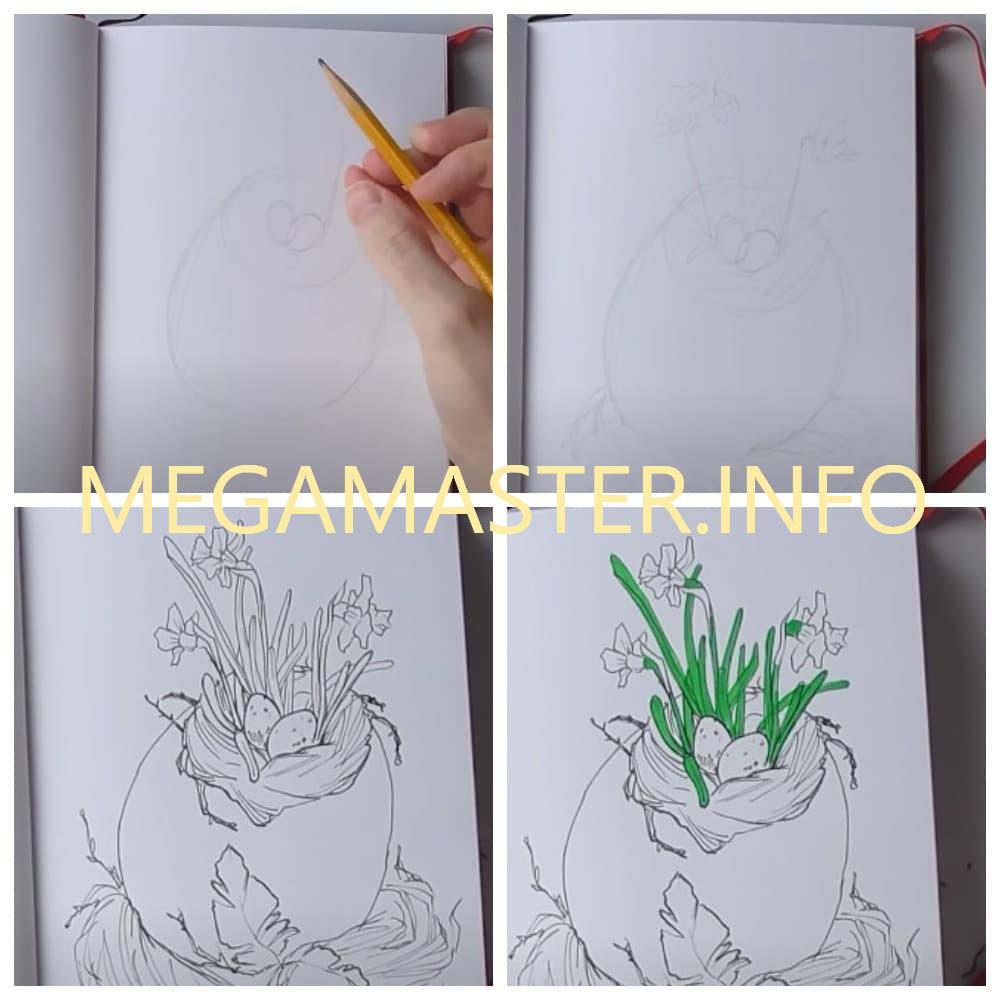
Draw markers Easter sketch.
Spring is the time of inspiration for sketches and drawings, the next important holiday after all the past – Easter. Easter cakes, painted eggs, candy and other joys after a long fast, which follows after the carnival for centuries please people and draw a sketch on the theme of this holiday is necessary!
Need:
- pencil
- leaf
- Liner
- marker
- First, make a pencil marking, oval lines slightly tilted sideways egg, on top of the egg plan a nest. Inside the nest we draw two small testicles and outline on the sides of the flowers – asters, from below we note with long oval lines the volume of a larger nest.

- On the side schematically note a few feathers, begin to draw a sketch. To do this, you can use a liner or black gel pen, small eggs we have quail, so cover them with a small black dot. Then draw flowers, they can be any from daisies to tulips, the pictures depict asters.
- Draw the flowers carefully, without smearing the lines. The sketch should be as close as possible to the live image, so the more winding and wavy the lines, the better. Further with a light hand strokes draw the volume of the nest, it is necessary to show the movement of straw, because it is not firmly rolled into a nest and it is also worth showing that some straws stick out or fell out of the structure of the nest.
- Now gently on the pencil contour we outline a large egg, and add feathers can add one or more next to the egg or a little further, also depict the winding lines, as natural as possible. After that, we depict the volume of a larger nest similarly as painted smaller. Do not forget about the naturalness of the nest, the smoothness of the line and straw that accidentally fell out of the nest, further erase the lines from the pencil.
- Thicker liner or black marker we outline the joints of objects, contours of nests, flowers, feathers and all that needs to be emphasized. We start coloring, you can use markers, pencils or watercolors, everything that is at hand.
- Bright green color color sprout and leaves of flowers, flowers paint depending on what color they in real life, we have in the picture of the asters, so paint them light yellow. 7.Dark green denote shadows on the stems and then dark emerald show the darkest areas near the root and the right side, as the sun falls on the left. With a christ marker add strokes to the buds of flowers, the same color can add yellows on the foliage.
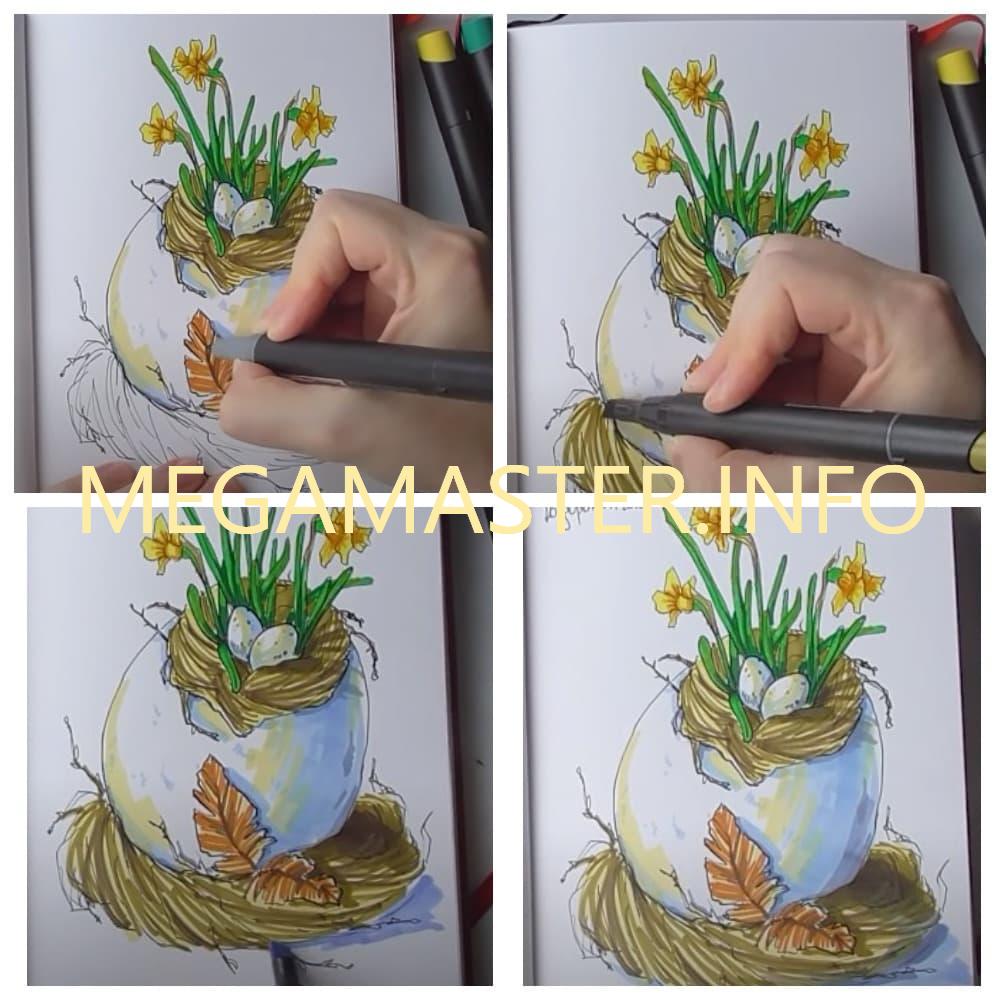
- Light brown add shadows to the asters, light gray-blue add shadow volume to the quail testicles, beige color add light. Small nest paint the same color, light brown mark the shadow joints, twigs of straw, but leave the lumen of the shade, which was applied earlier.
- Dark brown outline shadows from eggs and flowers, light gray-blue show the shadow volume, show that the light falls on the right, and the shadow on the left. Add beige shades and some irregularities in the form of strokes and gray deepen the shadows where necessary. Pale yellow paint feathers, then light brown color we hug the feathers of the line and show the volume.
- Color feathers you can choose yourself, using the imagination, meanwhile dark brown stronger ring joints and show volume. Pale yellow cover the main nest, dark yellow mark the right shadow, and the movement of hay, twigs.
- Dark brown lay again shadows and a few dark strokes, light gray-blue mark the bottom of the shadow from the nest and again strengthen the shadows throughout the work.